Microsoft Excel is a crucial tool for data management, widely used for everything from simple lists to complex financial models. One essential feature is the ability to lock and unlock cells, which helps protect data integrity by preventing accidental changes.
Locking cells is particularly useful when sharing spreadsheets with others while unlocking cells is necessary to allow specific data inputs or updates. This blog will guide you through unlocking cells in Excel, providing clear, step-by-step instructions to help you manage your spreadsheets effectively.
Section 1: Understanding Cell Locking in Excel
Cell locking in Excel is a feature that allows you to protect specific cells from being modified. When you lock a cell, you prevent users from editing its content, which helps maintain the integrity of your data. This is particularly useful when dealing with complex formulas or important data that should not be altered.
By default, all cells in an Excel worksheet are unlocked, meaning they can be edited freely. This default state is practical for initial data entry and setup but poses risks when sharing the worksheet with others. Unintended modifications can disrupt calculations, cause errors, and compromise the data’s accuracy.
Protecting a worksheet by locking cells is crucial for maintaining data integrity. It allows you to control which parts of the worksheet can be edited and ensures that critical data and formulas remain unchanged. This level of protection is essential in collaborative environments where multiple users access and edit the same spreadsheet, helping to prevent accidental or unauthorized changes and preserving the reliability of your data.
Step-by-Step Guide to Lock Cells:
- Select the Cells:
-
- Highlight the cells you want to lock. You can select a single cell, a range of cells, or even entire columns or rows.
- Open ‘Format Cells’:
-
- Right-click on the selected cells and choose ‘Format Cells’ from the context menu. Alternatively, you can access this option from the ‘Home’ tab by clicking on the small arrow in the bottom-right corner of the ‘Alignment’ group.
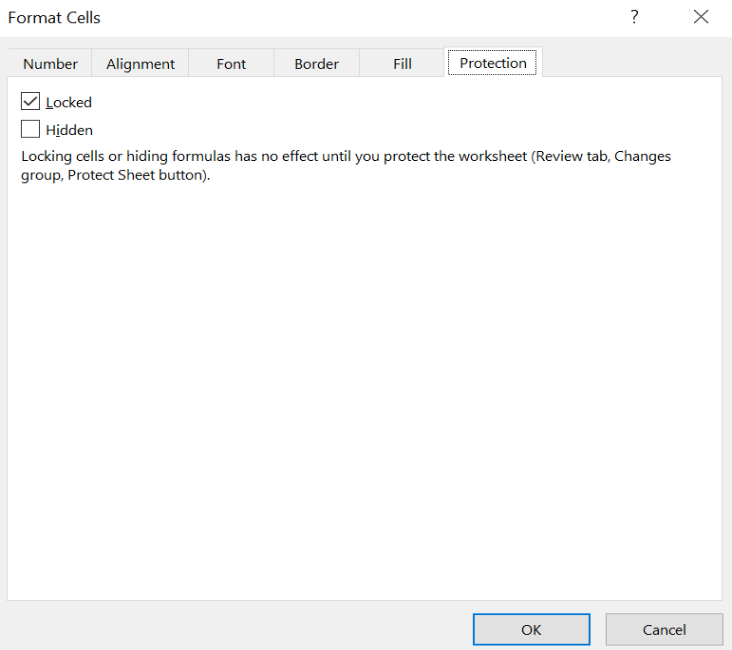
- Access the ‘Protection’ Tab:
-
- In the ‘Format Cells’ dialog box, navigate to the ‘Protection’ tab.
- Check the ‘Locked’ Box:
-
- Ensure the ‘Locked’ checkbox is checked. By default, this box is checked for all cells, but you need to confirm it for the cells you want to lock.
- Protect the Worksheet:
-
- Go to the ‘Review’ tab on the Ribbon.
- Click on ‘Protect Sheet’.
- Enter a password if desired (optional) and configure the protection settings according to your needs.
- Click ‘OK’ to apply the protection.
Tips on Which Cells to Lock and Common Scenarios:
- Lock Critical Data:
-
- Lock cells that contain important formulas or data that should not be changed, such as calculation results or sensitive information.
- Protect Formulas:
-
- Lock cells with formulas to prevent accidental edits that could affect calculations across the worksheet.
- Common Scenarios:
-
- When sharing spreadsheets with team members who need to input data but should not modify the underlying formulas or fixed data.
- In templates where you want users only to edit specific input fields while keeping the rest of the document protected.
Step-by-Step Guide to Unlock Cells:
- Select the Cells:
-
- Highlight the cells you want to unlock. Depending on your needs, this can be a single cell, a range, or even entire rows or columns.
- Open ‘Format Cells’:
-
- Right-click on the selected cells and choose ‘Format Cells’ from the context menu. Alternatively, you can access this option from the ‘Home’ tab by clicking on the small arrow in the bottom-right corner of the ‘Alignment’ group.
- Access the ‘Protection’ Tab:
-
- In the ‘Format Cells’ dialog box, navigate to the ‘Protection’ tab.
- Uncheck the ‘Locked’ Box:
-
- Uncheck the ‘Locked’ checkbox to unlock the selected cells. This will allow users to edit these cells when the worksheet protection is applied.
- Ensure the Worksheet is Protected:
-
- For the unlocking to take effect, the worksheet needs to be protected. Go to the ‘Review’ tab on the Ribbon.
- Click on ‘Protect Sheet’.
- Confirm the protection settings and click ‘OK’. If the sheet is already protected, these changes will take effect immediately.
Tips on When to Unlock Cells and Scenarios Where Unlocking is Necessary:
- Allow Data Entry:
-
- Unlock cells where users need to input data, such as forms or data entry fields while keeping other cells protected.
- Enable Edits in Specific Areas:
-
- Use unlocking to allow modifications in specific areas of a worksheet, such as comments or notes, while protecting formulas or fixed data elsewhere.
- Common Scenarios:
-
- When creating templates or shared documents where users need to edit certain sections but should not alter the protected areas.
- For worksheets used for collaborative projects, where only specific cells need to be editable by different team members.
Advanced Tips and Tricks
Using the ‘Allow Users to Edit Ranges’ Feature:
- Access the Feature:
- Go to the ‘Review’ tab on the Ribbon.
- Click on ‘Allow Users to Edit Ranges’.
- Set Up Edit Ranges:
- In the ‘Allow Users to Edit Ranges’ dialog box, click ‘New’ to create a new editable range.
- Define the range of cells that you want users to be able to edit.
- Set permissions for these ranges by adding users or groups who are allowed to edit them.
- Click ‘OK’ to save the settings.
- Protect the Worksheet:
- After setting up editable ranges, protect the worksheet by clicking ‘Protect Sheet’ in the ‘Review’ tab.
- Ensure that the option to allow users to edit ranges is selected so that specified ranges remain editable.
Scenarios Where Partial Locking and Unlocking are Beneficial:
- Collaborative Workbooks:
- When working on a shared workbook where different team members need access to specific areas but not the entire sheet. For example, you might allow data entry in certain cells while protecting formulas and critical data.
- Templates and Forms:
- In templates where users need to input data in certain fields but should not modify the structure or formulas. Partial locking ensures users can only edit designated input areas.
- Conditional Access:
- When you need to provide varying levels of access to different users, such as allowing certain team members to update data while keeping other sections protected.
Tips for Managing Permissions and Protecting Sensitive Data:
- Use Password Protection:
- Always set a password when protecting a worksheet to prevent unauthorized changes. Ensure the password is strong and shared only with trusted individuals.
- Regularly Review Permissions:
- Periodically review and update the permissions and editable ranges to ensure they align with current project requirements and team roles.
- Monitor Changes:
- Keep track of changes and edits made to the worksheet by using features like ‘Track Changes’ or creating a version history. This helps in auditing and ensuring data integrity.
- Backup Data:
- Regularly back up your Excel files to prevent data loss in case of accidental changes or corruption. Having backups ensures that you can recover the original data if needed.
Common Issues and Troubleshooting
Common Problems Users Face When Locking or Unlocking Cells:
- Cells Not Locking as Expected:
- Issue: Cells appear to be locked but are still editable after protecting the worksheet.
- Solution: Ensure that you have properly protected the worksheet. Double-check that the cells you intend to lock are indeed marked as ‘Locked’ in the ‘Format Cells’ dialog box. Also, verify that the worksheet protection is active by checking the ‘Review’ tab.
- Cells Not Unlocking as Expected:
- Issue: Cells that should be editable remain locked even after you’ve unchecked the ‘Locked’ box.
- Solution: Confirm that the worksheet is protected. Unlocking cells will only take effect when the worksheet protection is applied. Go to the ‘Review’ tab and click on ‘Unprotect Sheet’ if needed, then reapply protection with the necessary editable ranges.
- Unable to Set Permissions for Edit Ranges:
- Issue: Users may face issues adding or configuring permissions for editable ranges.
- Solution: Make sure you have the correct permissions to modify the protection settings. If you’re using Excel online or in a restricted environment, certain features might be limited. Try these steps in a different environment or consult your IT department for assistance.
- Password Protection Issues:
- Issue: Difficulty in setting or recalling passwords used to protect worksheets.
- Solution: Ensure that passwords are correctly entered and note that Excel passwords are case-sensitive. Use a password manager to securely store and manage your passwords. If you forget your password, Excel does not offer a built-in way to recover it, but third-party tools may assist in recovery.
Solutions and Workarounds:
- Reapply Protection Settings:
- Sometimes reapplying protection settings can resolve issues. Unprotect the sheet, make necessary adjustments, and then reapply protection.
- Update Excel:
- Ensure you’re using the latest version of Excel, as updates often fix bugs and improve functionality.
- Use Excel Help Resources:
- Utilize Excel’s built-in Help feature by pressing F1 or accessing the Help menu for troubleshooting tips and detailed instructions.
Helpful Resources and Forums:
- Microsoft Support: Microsoft Excel Support
- Excel Help Forum: Microsoft Community – Excel
- Excel Tips and Tricks: Excel Easy
- Stack Overflow: Excel Questions on Stack Overflow
Conclusion
In this blog, we’ve covered how to lock and unlock cells in Excel to protect data and manage editing permissions effectively. By following the steps provided, you can ensure your important data remains secure while allowing necessary updates. Practice these techniques to enhance your Excel skills and maintain control over your workbooks. If you have any questions or need further assistance, feel free to leave a comment below.
FAQs
Q1: How do I know if my worksheet protection is active?
- You can check if the worksheet protection is active by going to the ‘Review’ tab. If ‘Unprotect Sheet’ is an option, the sheet is protected.
Q2: Can I unlock cells without unprotecting the entire worksheet?
- Yes, you can set up specific ranges that are editable using the ‘Allow Users to Edit Ranges’ feature while keeping other parts of the sheet protected.
Q3: What should I do if I forget the password for a protected sheet?
- Unfortunately, Excel does not provide a built-in method to recover forgotten passwords. You might need to use third-party tools or restore from backups if the password cannot be remembered.
Q4: How can I share a protected workbook without compromising data integrity?
- Use the ‘Allow Users to Edit Ranges’ feature to specify which cells are editable, and set a strong password for the worksheet protection to secure data integrity.

